The Tea Time Toning Challenge - #MakeYourMove
Say good bye to those bingo wings with this routine that can be done while figuring out what’s for tea!
No need for the gym or fancy equipment just baked bean tins and little motivation.
Whether you are looking to tone up for the summer, a special event (strapless wedding dress anyone?) or just because it’s about time – this routine will help you get a bit of definition in your arms as well as strengthen your muscles and bones.
All of the steps can be done seated or standing and you will feel the benefits whether you choose to use the tins as weights or you decide that they are too heavy for you right now. You don’t need weights at all to build strength and definition as long as you use slow and control moved.
So what are you waiting for? Open the cupboard and get those arms toned!
The challenge in a nutshell
| Your | Why |
|---|---|
| Aim | To increase strength in your arms using only what’s in the cupboard – no gyms required. |
| Benefits | This exercise will give you firmer, tighter and shapelier arms. It will increase muscle mass and strengthen muscles. All of the exercises are focused on your triceps and biceps to really work those bingo wings. |
| Goal | To start seeing and feeling some real difference, do this every day for a month. If a can of beans or soup is too heavy to start with, do the exercise without the weights. When you start to build strength, see what else is in the cupboards – bags of rice and filled water bottles are perfect weights. |
| Next steps | Now that you have built up some strength and tone in your upper arms and shoulders, you should keep doing this daily routine to keep this fitness level. Increase the weight you are working if you want a more advanced workout. |
Your daily routine
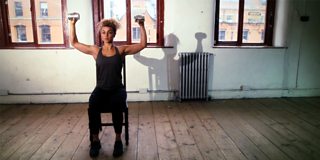
Step 1 – The Robot
- Start off without any tins to begin with, adding them in once you feel stronger in your upper arms. Use the video at the top of the page as a guide as you do this.
- Whether you are doing the routine seated or standing, make sure your back is straight and your stomach is pulled in towards your belly button to support your back
- Keep time with the video – these should not be fast moves.
- Position 1 - Put your arms straight to the side so they form a perfect line
- Keep your arms up, bend your elbows so that your forearms are at 90 degrees and the inside of your arms are facing downwards
- Position 2 – staying in position 1, twist your upper arms so that your arms are now facing outwards and your hands are in the air
- Position 3 - Push both arms up above your head, keeping them straight (but slightly bent at the elbow – don’t lock your joints)
- Now we are going to reverse the moves. From having your arms straight above you, bring them back down into Position 3, with your elbows bent and forearms facing out, then go into Position 2 with your elbows bent but forearms facing down, then Position 1 with your arms out to the side.
- Keep the moves controlled and make sure you are keeping your elbows up – those bingo wings aren’t going anywhere without some resistance so make sure you are keeping your positions nice and strong.
- Now go to Step 2.
Do this exercise 10 times for the first 10 days, then work up to 20. When you start feeling stronger, do 2 sets of 20, gradually increasing to another set of 20, then another until you are able to do 5 sets of 20.
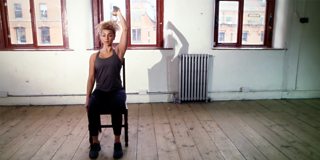
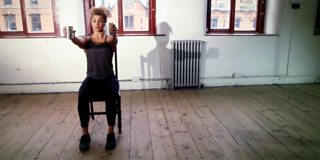
Step 2 – Overhead bean move
- Keep your back straight throughout this exercise, and keep the moves slow and controlled.
- Either with an empty hand or holding a can of beans in one hand; raise your hand above your head keeping the bicep close to your head.
- Bend your forearm behind your head then rise back up. Keep your elbow close to your head – don’t let it go out to the side
- Now lift your forearm again into the starting position and repeat 10 times.
- Repeat on your other arm for 10 repetitions.
- If you want to get technical, these are commonly called Single Arm Triceps Extensions
Do this exercise 10 times on each arm for the first 10 days, then work up to 20. When you start feeling stronger, do 2 sets of 20, gradually increasing to another set of 20, then another until you are able to do 5 sets of 20.
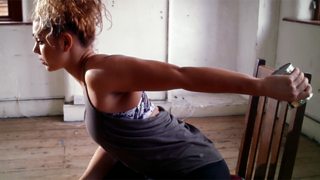
Step 3 – Behind your back beans
- This one is a Bingo wing buster, focusing on the triceps.
- Seated or standing, keep your back straight and lean forward keeping your head and neck facing forward too
- Bend one arm at the elbow and move it so that it is at a right angle behind you
- Raise your elbow up and straighten the arm out behind you keeping the elbow in place
- bend your elbow again so that it comes back in starting position
- repeat this on that arm 10 times
- change arms and repeat 10 times
- Grown-ups probably call this exercise the Triceps Kickback. We like Behind your back beans.
Step 4 – Double Tin
- Seated or standing - with or without tins – hold both arms out stretched stright in front of you at chest level
- Keep your back nice and straight, with those tummy’s tucked in
- Bend your forearms back so the tin touches your shoulders. Return to the starting position with straight arms.
- You should be able to feel the effects in your chest, shoulders, upper back and upper body.
Do this exercise 10 times on each arm for the first 10 days, then work up to 20. When you start feeling stronger, do 2 sets of 20, gradually increasing to another set of 20, then another until you are able to do 5 sets of 20.

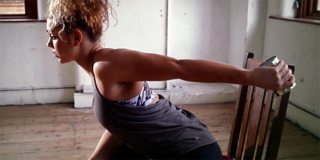
Step 5 – Chair Lifts or Dips
- Sit on the edge of a chair or sofa with your hands beside you, your back straight and your stomach tucked into your belly button
- Your feet should be together with your knees bent in front of you
- Option 1 - Push down on the seat with your hands so that your arms and hands are taking the weight of your body. It may not move much, but your behind should lifted off the seat a little. Ease your butt back down and bend your elbows. Repeat 10 times.
- If you have found this difficult, you should continue to do this exercise until you have built enough strength in your arms to be able to take your weight.
- Option 2 – if you found that too easy, when you lift yourself off of the seat with your arms, move your knees forward so that your body moves off of the seat and lower your behind slowly so that your elbows are bent at 90 degrees and you are supporting your weight in your arms. Straighten the arms, pull the knees back into starting position and sit yourself back down on your behind. Repeat 10 times.
- Whether you are doing Option 1 or Option 2, make sure you keep your movements slow and controlled to feel the full benefits.
- Remember to keep your elbows bent at all times – you should not lock your arms straight at any point during the exercise. This could cause injury.
Do this exercise 10 times on each arm for the first 10 days, then work up to 20. When you start feeling stronger, do 2 sets of 20, gradually increasing to another set of 20, then another until you are able to do 5 sets of 20.
Don’t forget
- Track your results - motivation looks different for everyone, but nothing helps you to see progress like looking back at how much you have achieved. If you would like to keep a manual diary, print and keep notes.
- Show us how you are getting on. Use #MakeYourMove on , or to join the conversation and see who else is hopscotching their way to better balance.
Need more convincing?
If you don’t want to use tins of food, bags of rice or bottles of water to help you workout, you can do all of the steps using dumbbells or traditional weights if you have them. As long as you keep doing the exercises, you will start to notice a difference – no matter how little or how much weight you use or what you use as weights.